Hi guys
Would really be happy to see you all in trumatter.in
Thats where you all will find me.
Love
Rukmini

Hi guys
Would really be happy to see you all in trumatter.in
Thats where you all will find me.
Love
Rukmini

Well hi! How have you been? Just popped in to show a coffee table and how it got some whitewash. From behind our jam room’s trash corner to our living room, this table has been a good girl, holding its wood and patina intact, even after all these years: this table belongs to my jam room owner’s mother. This used to be in their London home, in their living. When they shifted to India, this table crossed oceans and ended up in his storage with dead cockroaches and endless candy wrappers,until, God sent me in there 😉 You’ll agree when I tell you that I have this innate ability to make things sound very difficult and myself, extremely talented. No?

The first day I saw this beauty of a swan table, I told my husband I want to get it home. Of course, then it was a dying table with rusted wheels and ugly nails sticking out. Parties involved (henceforth will be ref to as ‘said party’) did not approve of it and asked me to walk with the table if I had to take it home, I cannot ride with that thing in this car. Lol, he has OCD and I have ‘let’s get filthy things and recycle’, making it an impossible situation. But nagging works! After many, many days of constantly expressing my need to take it home, he finally agreed to honor me with the ride. Thank you God for saving me the ride home in a tuktuk with this heavy thing. I am not in my hay days and I can’t carry wardrobes in Taxis alone, anymore.

before I get into showing you how, isn’t that little jewelry box a darling? My best friend went to France on a holiday and got me back this! To hold my lavender dreams. It’s these little things she thinks while picking up stuff that makes her so special. This now rests on my newly painted coffee table with other little blue things.
Back to swan coffee table-
Honestly, I thought of keeping the patina intact- it had beautifully chipped sides, gracefully aged and did I say chipped? But then ducco won over varnish! I think its simply because the wood had become dirty. Irrespective of sanding it down and giving it a good wash and dry, it refused to budge. And secondly, it was looking quite out of place in my home. It just stood out and in a bad way. After much thinking and rethinking, I decided on the same old white in which everything else in my home is painted but wanted a bit of that aged wood to show through.
After 2 coats of white, I chipped it carefully on spots to let the aged wood shine. Take a look.

Dont you just love it! So shabby and chic. I think Rachel Ashwell will approve of this in her ocean front home. If only she was watching this space. Sigh.
The shape of the base was such that it also inspired me to make a chair out of it. I wanted to do a seat and semicircular backrest. Like a statement piece of sorts with tucks. I almost narrowed down on a turquoise base and a coral seating with golden tucks. But the little birdie who stays here told me, simplicity is grace. Don’t change it to who she was. Just live her enough life to make her live another life.

This is from where I started. That’s Ice-tea btw, not beer. I would have loved to have a beer right now, but this is ice tea!

First I took out all the ugly nails sticking out
Thoroughly cleaned it with soap water
Next, I sanded it down a bit keeping the chippy, crackly surfaces and gave it two coats of white. Asian Paints plain white is what I use with a drop of blue or yellow depending on the color I am looking at.
The table already had space for suction base so bought suction holders to fit the holes on which my glass would sit. Once the paint was completely dry, I stud them in and put my glass.
Brought out my blue glasses which were again DIY-ed again and kept that little reminder from France. See the jamjars I did wuth the same technique below.

have a lovely weekend.
RoyXO

Well, hi! How have you been keeping. I’ll give you the gist of this blog post right at the start: I have been blamed for digression and methinks they are so right! So, yeah, picked up some discarded pipes yesterday while looking for Edison bulbs and made an industrial light out of it: this is going to be the topic of discussion today here in trumatter-lifestyle-blah-land, followed by an easy tutorial which you can use. And now, I am free to roam around in this space with words and tell you what a soppy week I’ve had.
Honestly, I am surprised that I still have it in me to make things out of nothing. For sometime, my head was a big foggy blur and all that came out of it, trying to find a permanent solution to a nagging problem, are more hopeless problems. This battle of possible ending and hold-onto-unending, among all other probabilities and possibilities, gave birth to two distinct rivers in my head, with each constantly either refuting or soothing the other. Like hot, molten lava meeting the ice cold ocean, and all it gave me was a brain full of super fog where seeing ahead is practically impossible. I am talking no-vision, let alone perspective, which is necessary to create. I had started to doubt myself and everything I have, am known for.

The best thing to do with a problem is to face it, they say, but how about your problems and solutions thrive in each other so perfectly that at one point of time you become the passive observer, feeding, nurturing them both with your energy and happiness, and willingly taking out time to wake them up. You have no solution, you have no problem but you are just not happy anymore. So I decided to do what should not be done. I decided to not think for once and look into not feeding them with my time. To look deep within and find out those little patches that gave me extreme happiness- so much so that I almost forgot I had any problems to begin with- and find ways to amplify it. I decided to not face them and leave them as is, waiting for fate to unfurl things as I go along. Like duh! why did it take me so long to figure that whether i worry and bring it earlier than it should or wait for it to actually happen: whatever’s gonna happen is gonna happen anyway. Till it happens, let’s CTFO. {I’ll inbox you if you don’t know what that means}
The rivers vanished. There was light! And the lamps came out.
Finally, after days of brooding on things that I don’t really have to, I stepped out and pampered myself with some DIY love. I am generally not into beating my own drums but I really, really, really like how my little modern industrial lamp came out. best part is, it’s all made from a discarded, old PVC pipe!
Here are the supplies!

You will need:
3 bends that fit your pipe
Plastic pipe or iron pipe
A block of wood as base
Clamps and nails
A hammer
Spray paint in a color of your choice. I used mirror finish.

How To Make An Industrial Lamp From Plastic Pipes
Step 1: Spray paint the parts with 3 coats (with 15 minutes of drying time between each) of spray paint. I used silver because I wanted that typical industrial feel to it.
Step 2: Assemble the lamp and fix the bends to the pipe which will give you the frame
Step 3: Fix the base with 3 clamps to a sturdy base. I used a block of wood.
Step 4: Run the wires through the pipes (this might take some time)
Step 5: Attach one end to a holder and one end to a two pin. There are two wires in each end which you need to fix to two connecting metal strips.
I would use an edison bulb, ideally, but for now this is what I am happy with.
Here’s a step by step photo-tutorial of how to make an Industrial lamp

I didn’t have a photo to put on the lat sqaure so thought you all might find this heart sign handy 😛
That’s it from me today. I hope you all have enjoyed this bit.
Love
Roy XO
Sharing at:
Thursday
From My Front Porch To Yours – Treasure Hunt Thursday
Friday
The Shabby Nest – Frugal Friday

Wishing you all a very Happy Diwali! India is gorgeous at the moment and catching up here, is this little nook with paper lanterns. Made this guy for our coffee table this arvo and I am looking at making quite a few of these for our balcony. It’s so easy I’d just expect you’ll figure out: just in case you do want, leave me a comment. Meanwhile, here’re some snippets from my balcony!


Hey there! A good evening to you and how’ve you been in your neck of woods? We have a glow in the dark vase here in Trumatter land and I think you all should totally check this shabby chic vase: It’s a pretty pink in the morning and glows aqua at night! Yes, yes this is a two faced harlot-y, extremely good looking vase which deceives people into doing crazy things when its dark 😉
I love a vase with a story or two, and I love, love, love everything glow in the dark. It’s almost magical to see objects glowing at night around you: believe me! much as I am a beach house enthusiast, I am a trippy-stuff lover. Everything which gives me the slightest hint of illusion and magic quickly becomes my favorite. Don’t ask me why! If I could, I would have done away with reality a long time ago. But let’s keep those ultra-philosophical-discussions for drunken times yeah?

For now, let’s concentrate on the Rum bottle DIY!
What you see here is a quarter of Old Monk Rum (they have these XXX written on the label…I have no idea what is that supposed to mean but I am guessing it means you’ll see stars once you have drunk the entire bottle) and it goes fantastic with Thumbs-Up: reason why we see a lot of these in our life. Lat week, when a friend left one of these at home, I decided to put it to some good use other than throwing it away.

I’ve been thinking about making one of these for long: thanks to me quitting the rat race that I finally got around to. I got home some Asian Paints Glow In the Dark paste, which glows aqua, and tried painting a couple of lamps with them.
Oh me! Do I love them or do I lurrrveeee them! here’s how it looks at night!

Yup! Trippy right? Look at how beautifully it changes color.
Karma Chameleon must be looking just like this!
In case you are a GITD enthusiast, here’s a little tutorial for you.
You know, when I started making them, I faced with a lot of problems. But the one that bothered me most was, there was way too much information on the internet but not enough answers! It was like finding myself in a pool of glow in the dark info but no boat to wade through and get somewhere.
Some websites asked to use powder, some paint, some paste, some pigment: It is way too much information floating around but not enough meat. So I thought it would be good if you get the meat and one that’s cooked too 😉
Here’s all you want to know about Glow In the Dark
1. You will get powder, paste and premixed colors. You can mix pigment to the paste, powder to colored solutions and use premixed glow in the dark colors directly.
2. If you use acrylic colors with glow in the dark paint, will it glow the same shade? NO. You can mix acrylic colors as ‘tint’ to glow in the dark paste but it will not glow orange if you use orange. It will glow aqua or green or whatever light the particles emit. This is a phenomenon called Photoluminescence. By definition it is the emission of light from a molecule or atom that has absorbed electromagnetic energy. So what you use is a compound of Phosphorus: Zinc Sulphide and Strontium Aluminate are the two most common phosphors used in making GITD paints.
3. Just so you might ask, if you are like me, isn’t something supposed to emit heat when it radiate? a material can emit light either through incandescence where all atoms radiate or luminescence where only some atoms, called emission centers emit light. Glow in the dark paints uses luminescence to glow. Precisely why you’d get a better result if you use multiple coats to paint something. The more emission centers, the more the glow.
4. Can I paint over Glow In the Dark Paint? Yes you can but it won’t glow. The opaque, plastic paints will mask the particles.
5. How can I get maximum glow out of my glow in the paste paint? Multiple layers is the key. Paint a coat, let it dry, paint another. You should end up with a thick coat of Glow in the dark paint. Keep it under sun all day or fix a plain bulb on top. It’ll glow. For best result, use white paint as base and then paint with GITD paint.
6. What are the materials on which I can use glow paint? Glass, porcelain, Tshirts, wood and everything you please.
7. What colors are available in the market? You can get some cool colors like green aqua and red available. You can get from grade O to Grade 7 (80 to 60,ooo micron), depending upon the brightness you want. Larger the particles, brighter the glow, rougher the surface.
Look at it, putting a pretty face now…
This is me signing off and very happy! Hope you’ve enjoyed this little glow in the dark craft. And if you did, leave a comment or two. It makes my day.
Toodles XO

Welcome! How long has it been now?
Seriously! I missed catching up with you all so much: It felt like I have not spoken to you all for a zillion years. Meanwhile, I’ve tried to write many times in between but just couldn’t get myself to do it. When your head’s spinning with 1 gazillion different things, mostly work, and you are trying to cope up if not excel, you cannot write. Writing is personal and one needs to pour their heart into it. When the head is buzzing, the heart stops. And I can only write something if I am completely at peace and content with myself. I cannot blog for the sake of blogging, to maintain ‘Hygiene’ {yes, this is what the word ‘ethics’ or ‘necessary’ has boiled down to}, or keep the traffic flowing. I hope you can fairly guess why I have been MIA for a while. Thanks to a little beach-house-fairy who waved her magic wand and made me hopeful and dreamy eyed again.

Yes, a lot has happened to the girl behind this blog and trust me it’s not something I should be telling you all. No point making you all sad for what made me super sad, yeah? But thank God, its over. I think I almost lost it at one point and forgot all my manners too, but the boy saved me. He is a man of few but valuable words. After many days of constant turmoil, here I am at peace with myself and blogging about a DIY Honey Jar turned into a vase. What a peace to be out of the rut. Yes, I might not make enough money as I used to a couple of months back but you know what? When before 7 years the entire production business got to me, I left it and its fat paycheck and joined a content firm with just half the salary. Then I was living alone, I had no savings, I had no husband and no home. If I could make it then, I’ll make it now and anywhere. I refuse to sell my soul for money and I will never do that.
Good days are hopefully back. Bye bye constant, nagging, sour umbilical whiplash. Hello refreshing whitewash.

So I came home, washed away the stains of yesterday and washed a honey jar clean.
Spray painted it with white paint (you can use Krylon, Mosby or any brand. You can also use Asian Paints white and use a brush instead. It’s all cool)
Let it dry over night and did a little modge-podge
Printed this rose design out and cut it as close to edges as possible
Brushed the print side with a generous amount of modge-podge and stuck it face side down.
Rest it overnight.
Next, smear it with some water (just smear, don’t make it swim in it) and slowly, with the help of your finger tips, and with a very light hand, rub off the extra paper pulp. You want to be left with a very thin layer of paper with the design in it for it to look like its painted.
Once you have achieved the desired thickness, wipe it dry and brush another layer of modge-podge on top to seal.
Rest for about 2-3 hours and you are good to go!
Easy peasy right?
P.S: If you are too lazy to make, this is up for sale on ebay.
This is me signing off. Be crafty, not cranky.
Rukmini XO

Hello, hello! How goes it? ‘Shubho Mahalaya’ to all of you reading me here and a bit of fall decor and drapes made from an old saree (yup, that’s right) is what we are going to be talking in here this evening! It’s actually 10:48 at night and I am sipping my chamomile and blogging: a few of my favorite things to do.
God knows I have been meaning to blog for a while now. But can I tell you, everyday is a broomstick day with so damn much to do. Like Marco Pierre White would tell ya,”Time’s not your friend”. I just wake up and kaboom, the day’s gone. What a struggle it is, these weekdays. I am so time starved, leisure starved-oh I want to say this again, I am so time starved- that I can barely get around to blog. But I guess it’s good to keep everything aside once in a while and do what you love to do. Everything else can wait!

This is my favorite corner of the house! I drink tea here, I work here, I laze here: This is where I spend 75% of the day. I also let people I like sit in this corner but only people I like. People I don’t like, I strategically place myself there like a concrete so they can’t sit in here. Does that make me mean? Can a girl have no place of her own? Melodrama aside, the pretty orange drapes you see here was once in her life a saree. As I hear, she was not so beautiful a saree- she had an ugly shine, felt like resin and kept inside my mom-in-law’s bed forever now- and, so we decided to turn her into a plush drape for the wannabe beach house. I am loving the autumn glow its throwing over my room. She is so much better as a drape than a saree.

I am totally loving this pop of color in this white space. To go with tangerine/orange I got the money plant indoors in a refurbished sweets-basket which was crying for help in an empty flat which we wanted to rent. Yes, you should surely talk about my disgusting behaviour of trash picking 😀 Paired the little corner seat with a black and white stripey to bring out the orange a bit more. But who doesn’t know how to foof properly! All this is a little boring. What’s not boring is where I got the idea from!
You’ll laugh. As it happens that a friend is getting married in December and me and mumma were figuring out what to wear. She came up with this brilliant idea of turning her old sarees into salwar suits: An idea I quite liked. We digged stuff in her storage an entire evening and selected this particular saree to turn into a gorgeous suit. The sis in law and I also spoke of a Pakistani design and this and that and oh my, I was almost wearing it in my dreams. That evening when I came home and told my husband of our plans, he saw the saree and said, “Dude, this looks like a curtain. Are you serious about wearing this? You’ll look hideous.” This boy I tell you has not a thread of sugar in his words. You just get as is.

Heart-broken, I stashed it away in my storage. 2 weeks later I was craving to turning it into curtains. I just had to have some fall elements and a bit of Indianness to go with this white wannabe beach house for Durga Puja and Diwali and nothing but that saree would do. I was a little worried mum won’t like it. When I asked if I could chop, chop, no one really cared. Clearly, no one wanted to wear this saree 😉 Haha, so yeah…boys are not completely useless with regards to home decor. Don’t always toss their words away.
How to make 2 minute drapes from old sarees
It’s fairly simple. Measure your window length. Measure the diameter of your curtain rod. The diameter of your curtain rod+ 4″ is the amount of length you need to keep while sewing/gluing the hem. If you don’t leave that extra inch, it’ll be too tight and you wont be able to move it.
I did a 1″ hem and then the final fold. I did a 1″ hem at the bottom to stop it from laddering. This I guess is given. And yeah! That’s all I really did.
I am also very proud of this wee cushion covers I made from the left over saree.
How to make 2 minute cushion covers from your old saree
Take a length of fabric that covers the cushion one full round and one half.
Fold the fabric and sew/ glue at a length where you think the cushion will comfortably fit in.
You’ll end up with a cushion cover and a flap. Glue velcro along the edges of the seam, on the inner side of the flap. Bring it down to where it touches the main cushion. Sew/glue velcro so the flap fits. Here’s a sketch i put together for the drapes and the cushions:

Its so easy even the mental one would get it! Imean if I can get it right, you definitely can. If you can sew, nothing like it. If you can’t sew, there’s fabric glue. I used glue and its rocking my boat.
Here’s a quick glance at the fabric of the drape before I end:

Would love to hear how you like it!
P.S: The DIY bit was originally done for Asianpaints where I blog 🙂 You can check my decor pieces up here
Must sleep XO
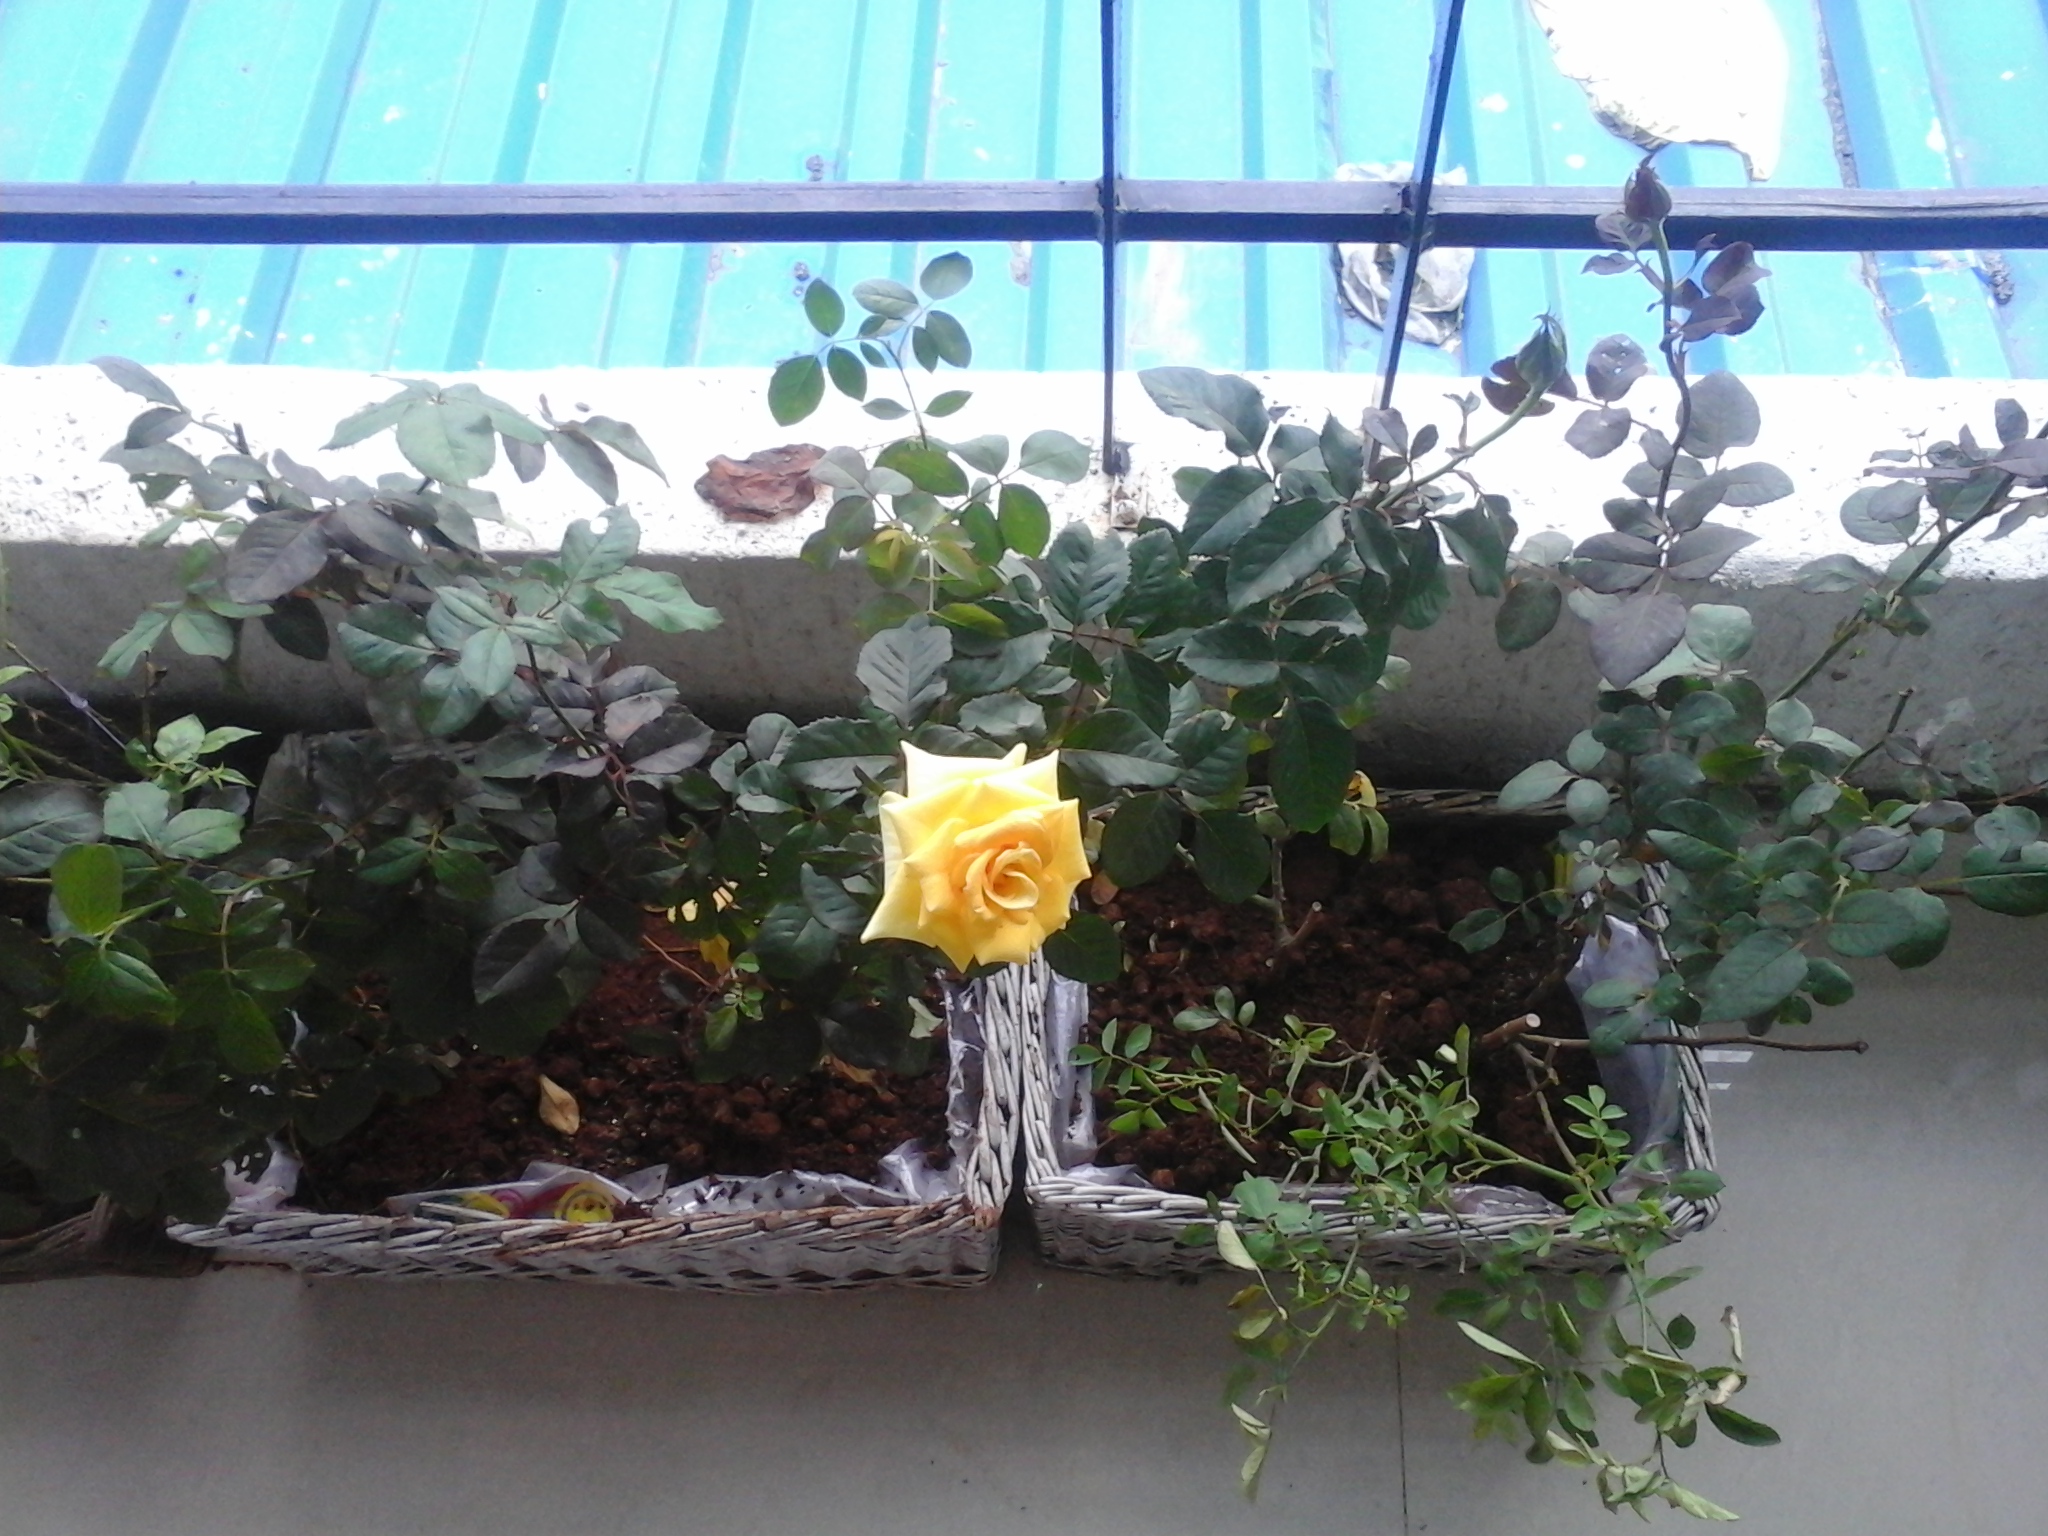
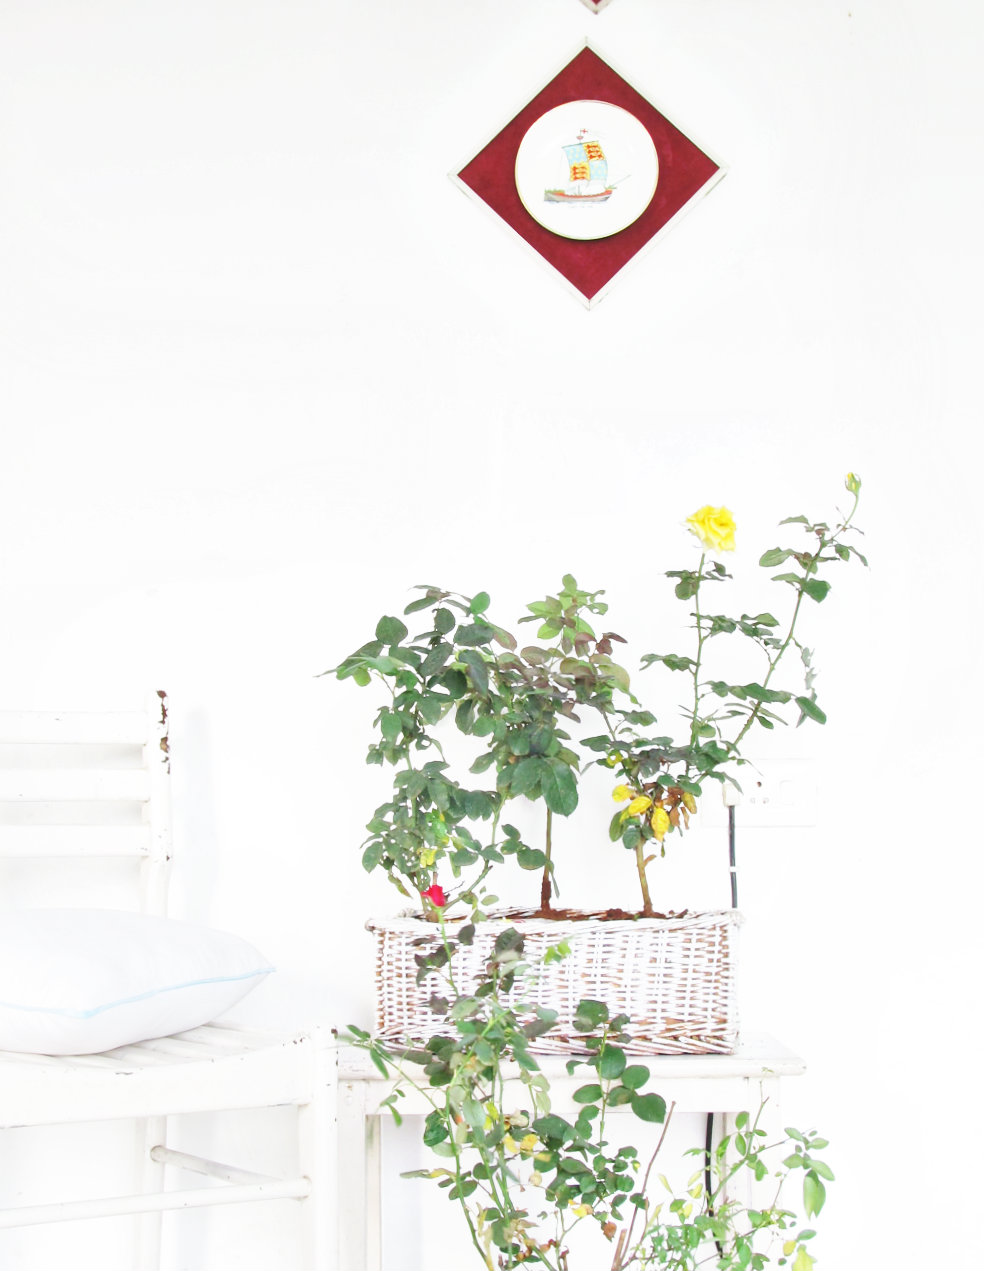 Goodmorning and a good day. How have you been holding up? If you are into gardening and live in a small apartment- which means if you are interested in shabby chic apartment gardening- there is a how-to-make-a-basket-planter in the house: It’s all old wicker baskets and some beach white love and some roses planted for winter. There is also some plant fertilizer dope, do’s and don’ts. Interested?
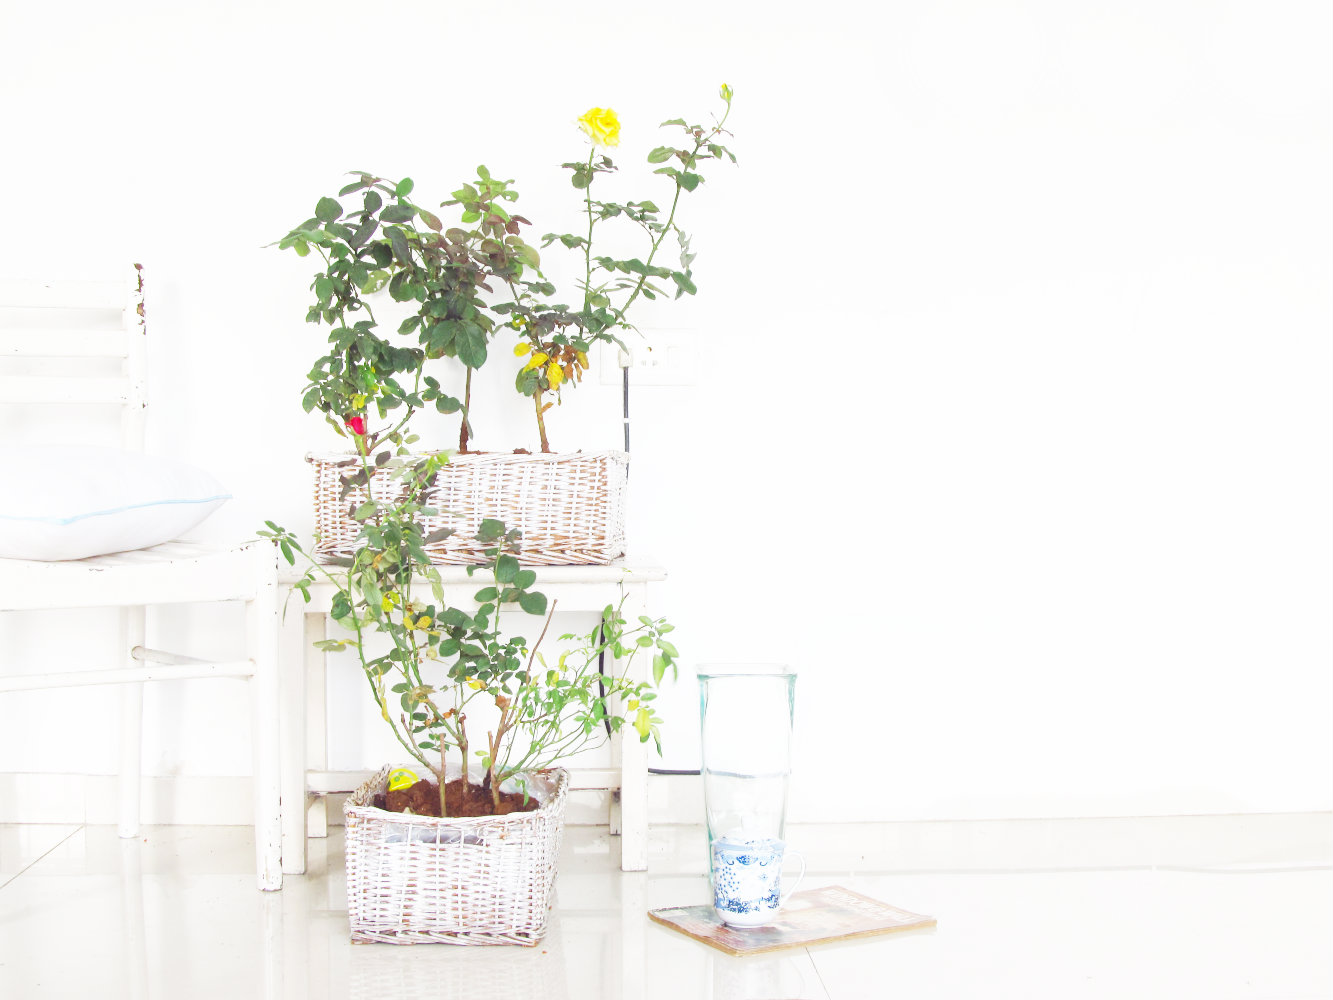 I got these wicker baskets for a throwaway price in one of the flea-markets, here in Mumbai and since then it has been on my list to turn them into a planter. Its not always that I buy something with such clear goal for the buy. Believe me, I don’t. I buy impulsively and turn one thing into another and re-turn it into something else if I don’t like the result. But this: I knew it from day 1 that they becoming planters. Worst part is for the longest time I did not have a home to myself or even a balcony! There were roomies and dirt and squafle over a pot of milk and which half of the fridge is it supposed to be in because the other half belongs to someone else: Oh My God! Those were the doom days.
So I let it sit in my storage/balcony forever (count 4 years) until today when I could actually get around to turn them into planters, and when i actually HAVE a home to myself and a balcony too. No good people, no good I tell you is your life without a balcony.
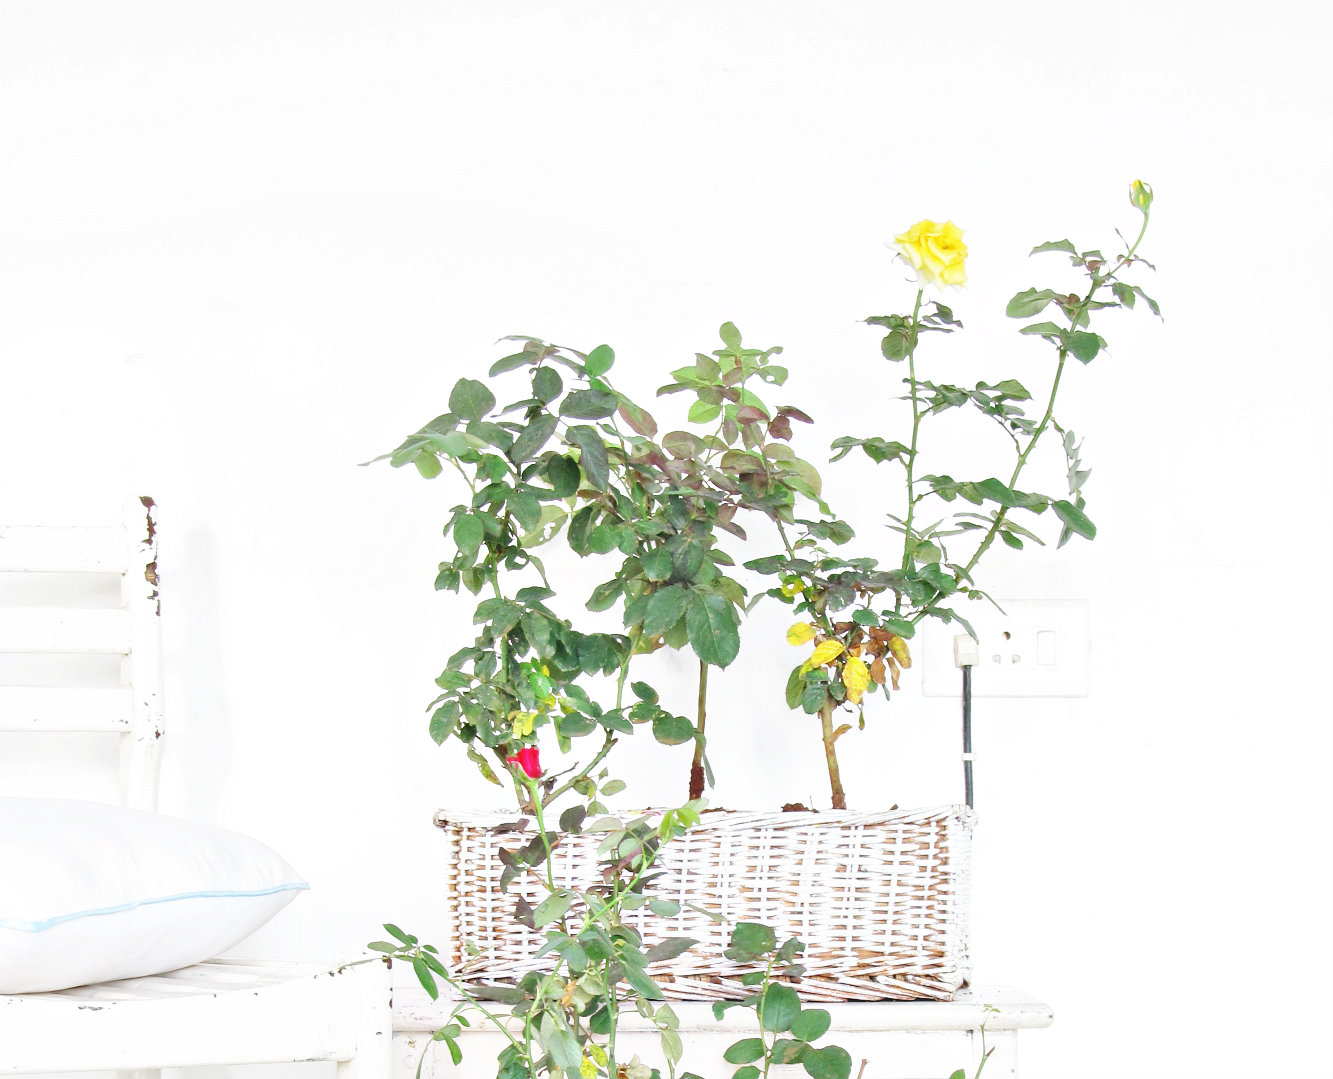
Anyway! Moving on, making a basket planter for you home is as easy as a pie. Well, the procedure is similar too! It requires you to do just 3 things:
1. Take a large polythene that sits in the basket and also have an inch or two to spare at the sides.
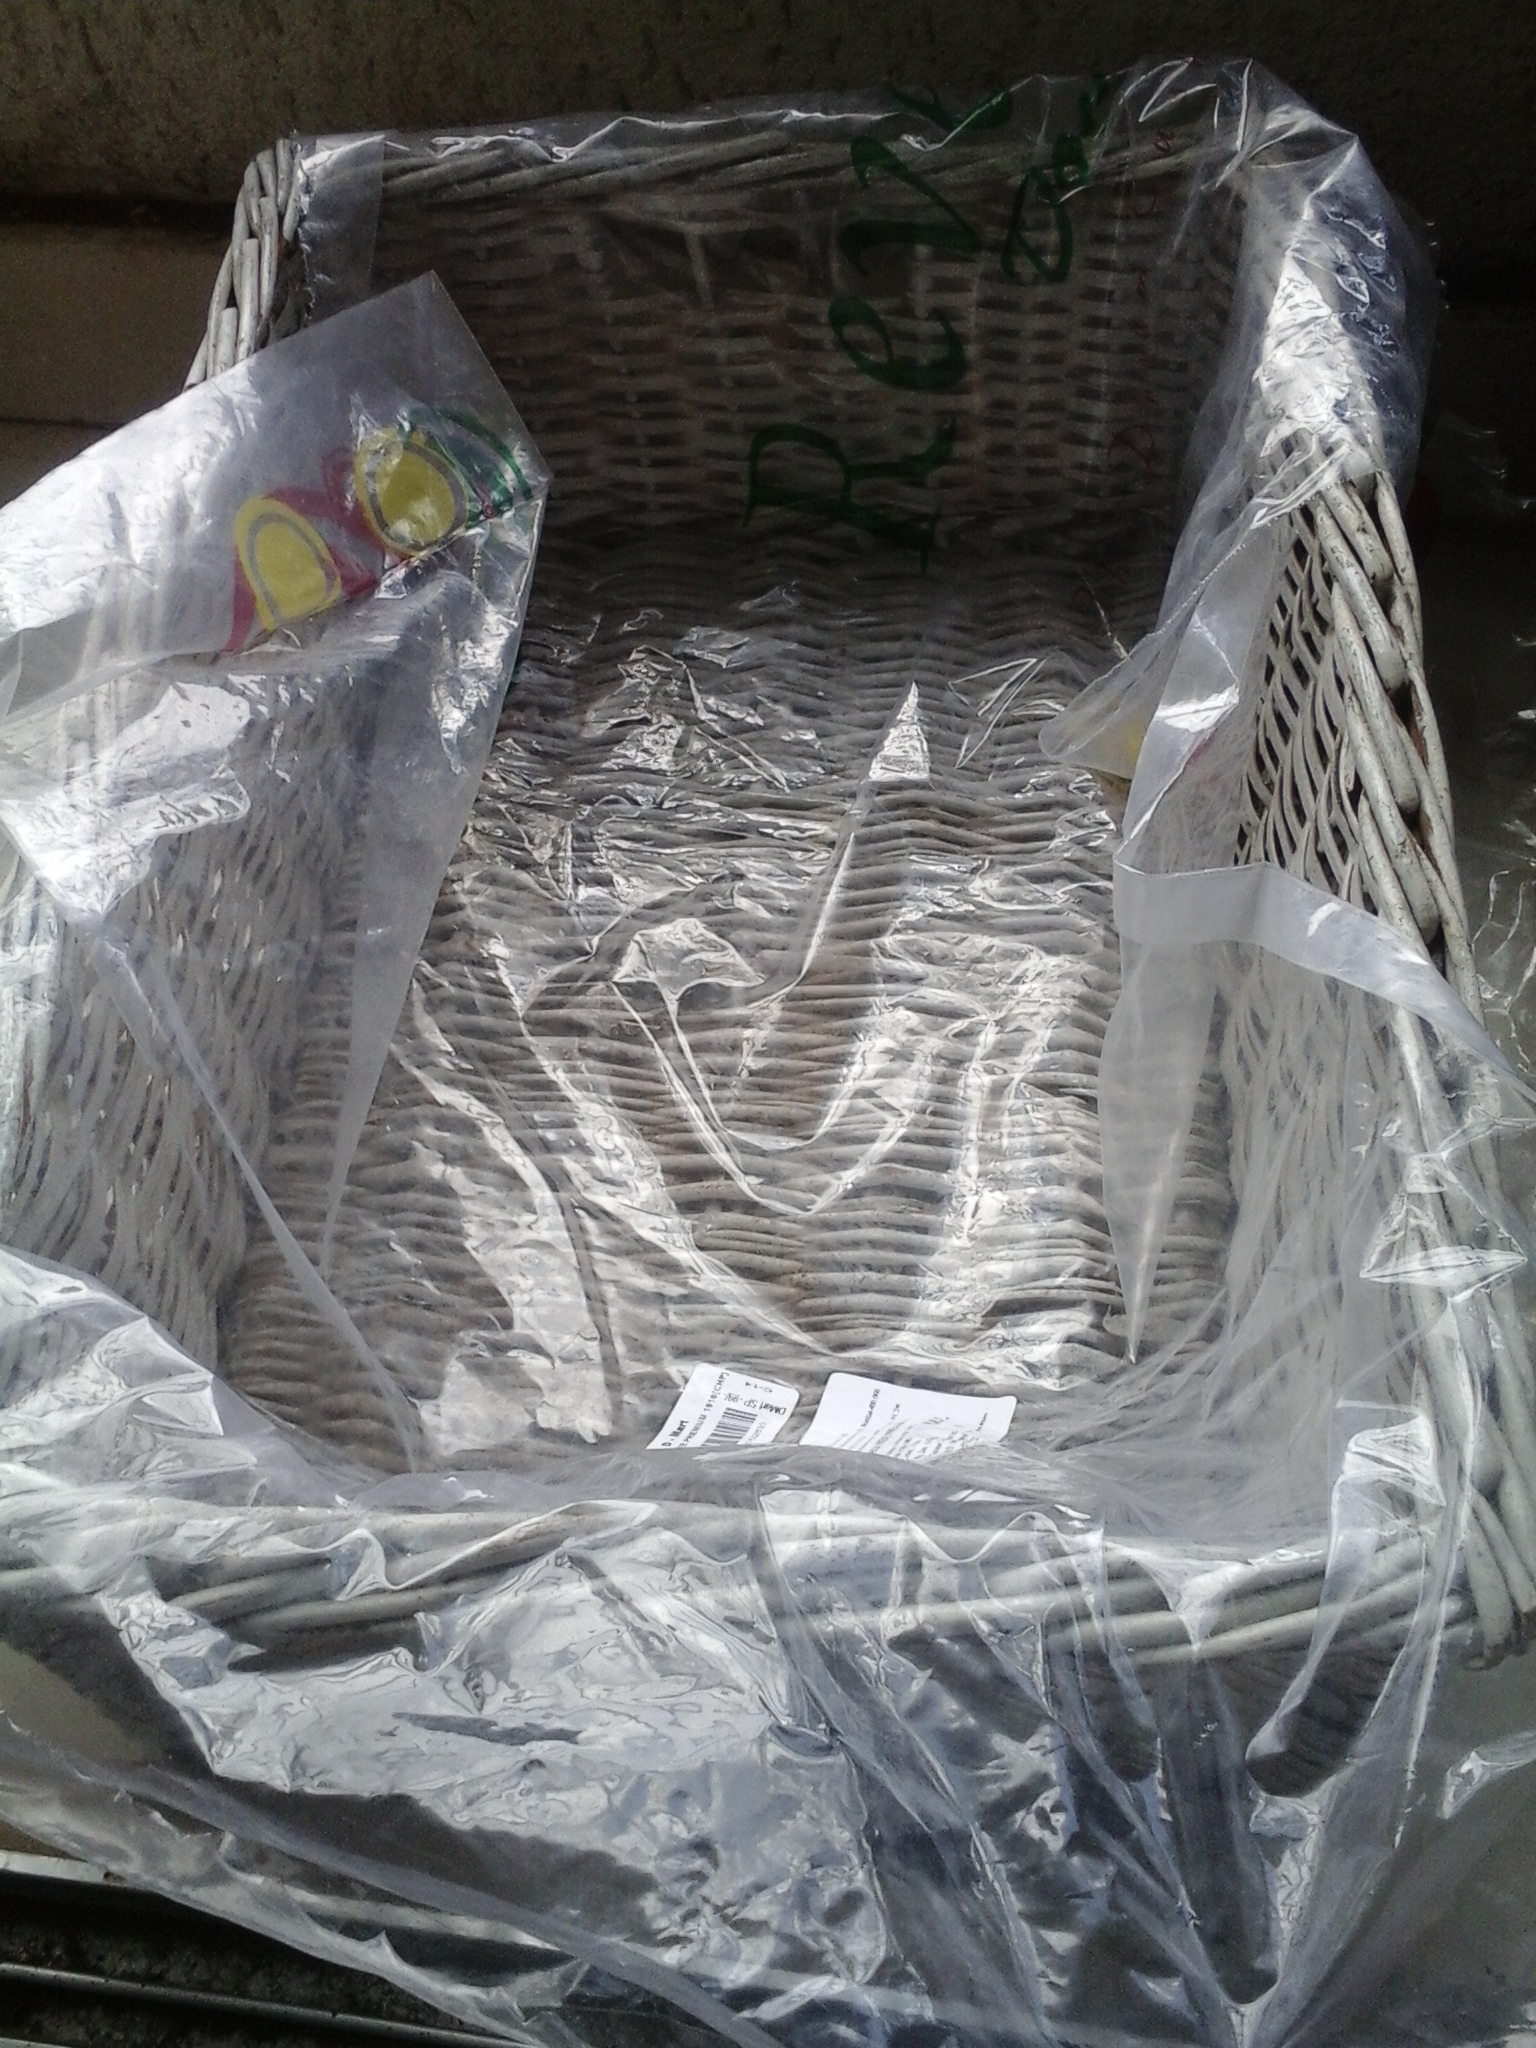
2. Poke holes in the polythene and add some soil to make it sit before you transfer your plants in
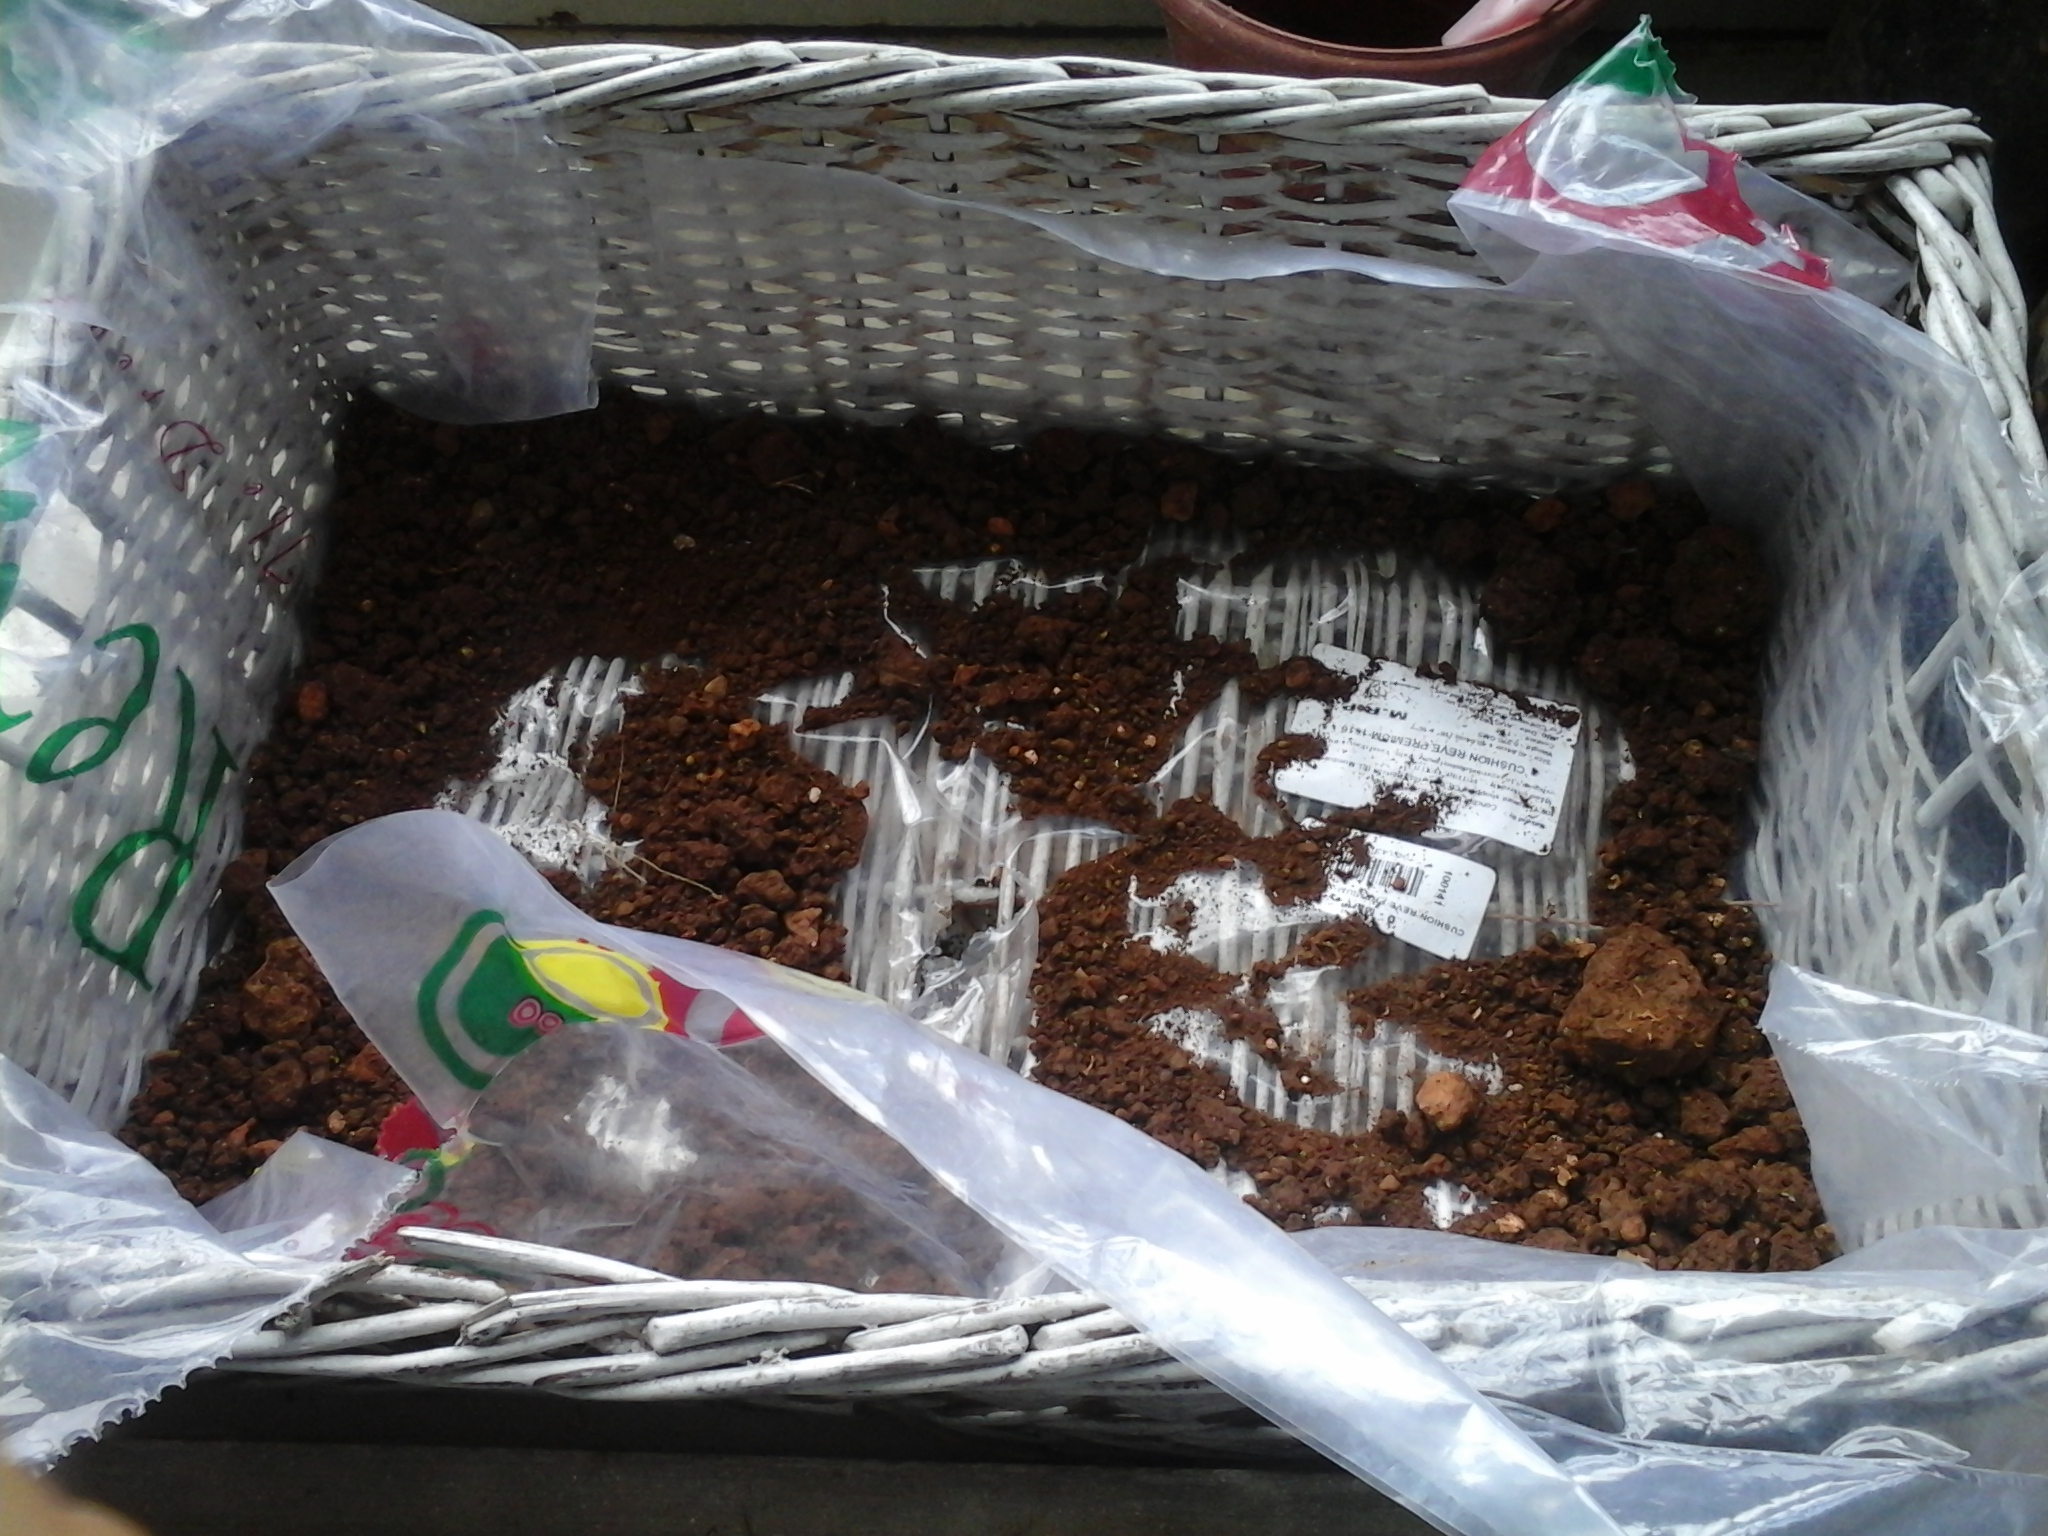
3. Transfer your plants in and pack soil. Before you pack in soil, mix a tablespoon of a good neem-based compost fertilizer to the soil. This will promote good health of the roots and stem.
You would also want a water soluble NPK fertilizer to spray every 1 day/week. For blooming season: 1 tbsp to 1 liter water. N-P-K stands for Nitrogen Phosphorus and Potassium. These 3 elements are responsible for better growth of the plant. I am pasting an excerpt from a website I closely follow:
“Nitrogen helps plants make the proteins they need to produce new tissues. In nature, nitrogen is often in short supply so plants have evolved to take up as much nitrogen as possible, even if it means not taking up other necessary elements. If too much nitrogen is available, the plant may grow abundant foliage but not produce fruit or flowers. Growth may actually be stunted because the plant isn’t absorbing enough of the other elements it needs.
Phosphorous stimulates root growth, helps the plant set buds and flowers, improves vitality and increases seed size. It does this by helping transfer energy from one part of the plant to another. To absorb phosphorous, most plants require a soil pH of 6.5 to 6.8. Organic matter and the activity of soil organisms also increase the availability of phosphorus.
Potassium improves overall vigor of the plant. It helps the plants make carbohydrates and provides disease resistance. It also helps regulate metabolic activities.”
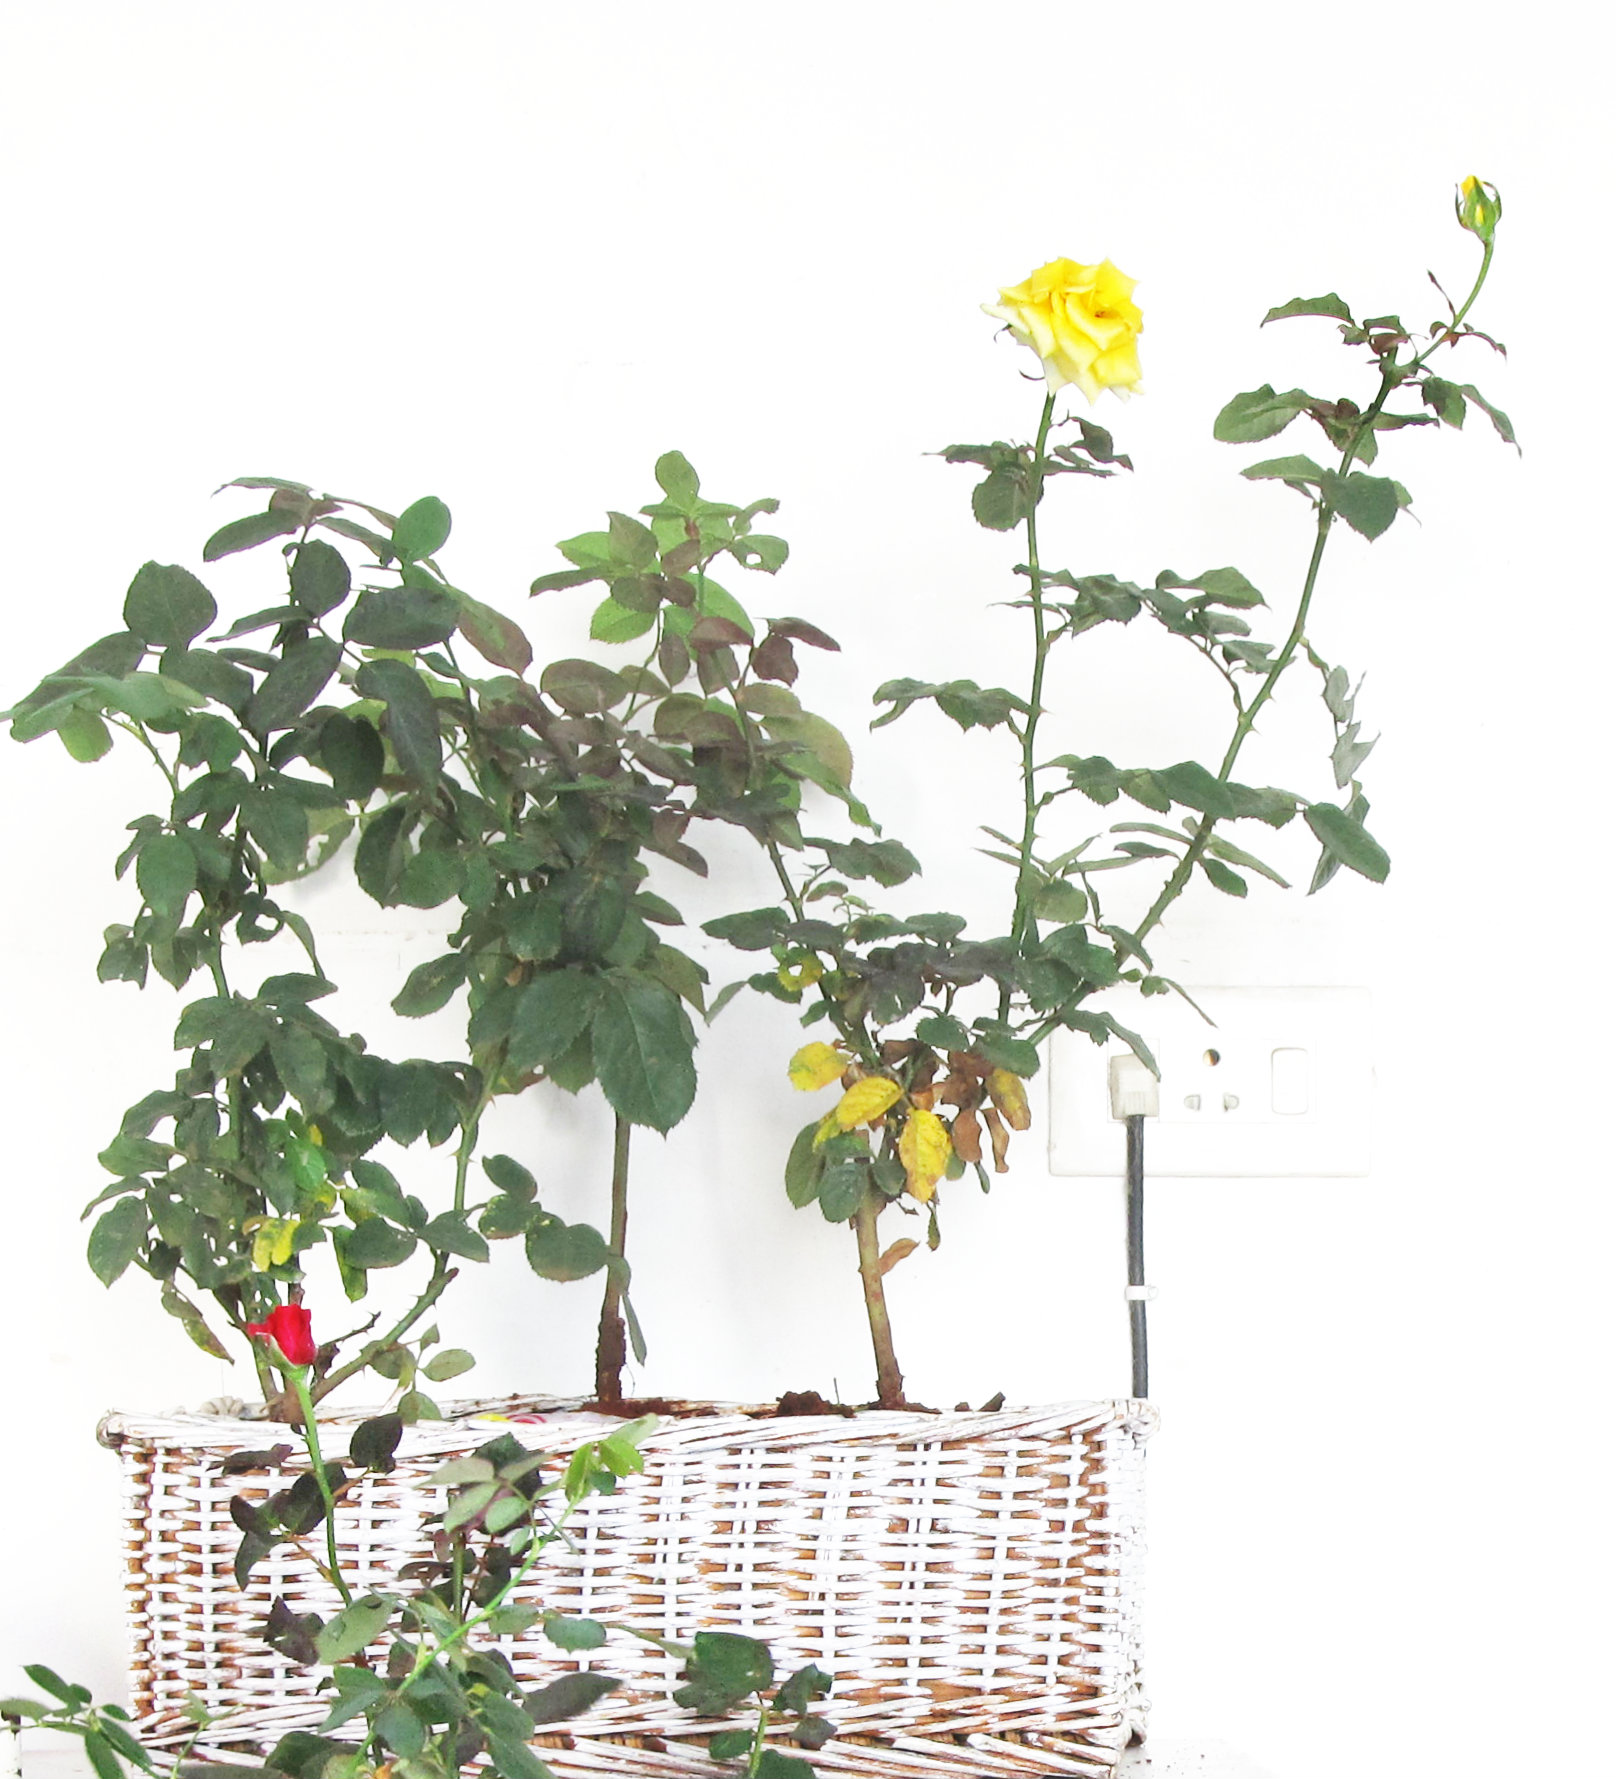
Once your plants are fed and happy, they will produce beautiful blooms in your apartment garden: All you need to do then is sit back and relax and have a cup of tea.
Easy right?
Sharing at:
Wednesday
http://www.savvysouthernstyle.net/2014/09/wow-us-wednesdays-187.html
Thursday
From My Front Porch To Yours – Treasure Hunt Thursday
Friday
The Shabby Nest – Frugal Friday
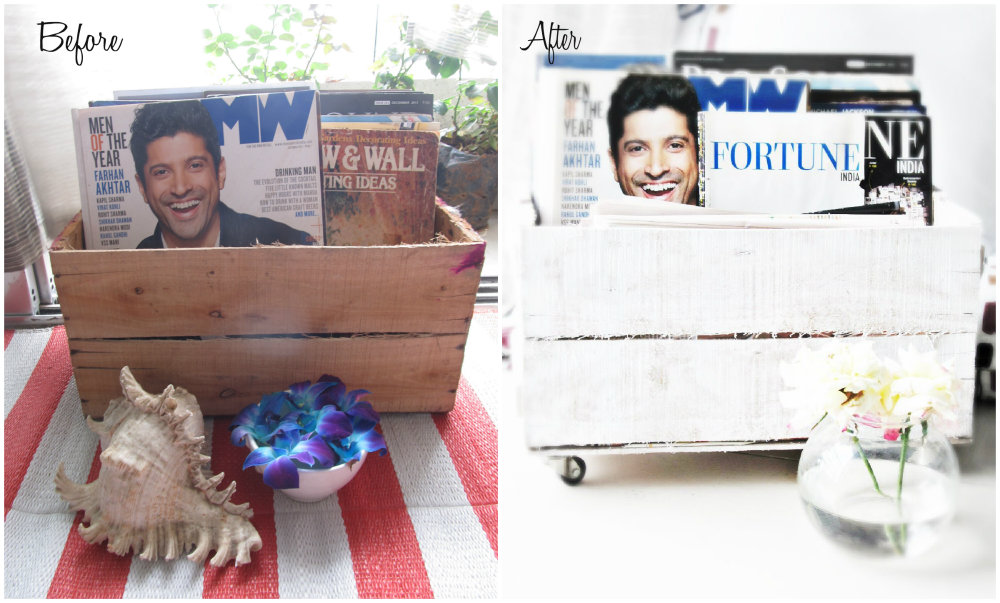
 Goodmorning Sunshine and honey and sugarstars and beachcombers. Very excited I am this morning to share this DIY Book Cart or Book Trolley as I would like to call it, and its made from an unwanted, weeping, curb side fruit-crate which once brought goodness and mangoes to someone I don’t know. That man just loved them mangoes and had no love for this wee old crate and he threw her away on the sidewalk: She had some snails comforting her when I found her. Poor girl! She is now the little star of my favorite spot by the window and the apple of my eye. It’s got me the rustic, industrial chic love that I have always been in love with. A cup of tea, poor-turned-beauty (lets call her Cinderella) and me: The universe is right there. And oh, the whole thing costed me about $8!!!

It’s been a while I did a decor post you know! I’ll blurt it out: My cam poofed. It just blew one day and never got back to life until last Friday. You can’t do much with a borrowed cam now, can you? So last week with its delivery I got home my hardware supplies too 😉 Guess you’ll be seeing me and my crafty side a lot henceforth, like before. I have a couple of projects lines- one which concerns a wall, one which concerns the guest bathroom and ofcourse a bit of curtain love too- which I am gonna tackle one at a time and I’d love for you to be with me and tell me if the moolahs are worth spending on what I decide. For now, here’s a peak at the crate, how I found it!
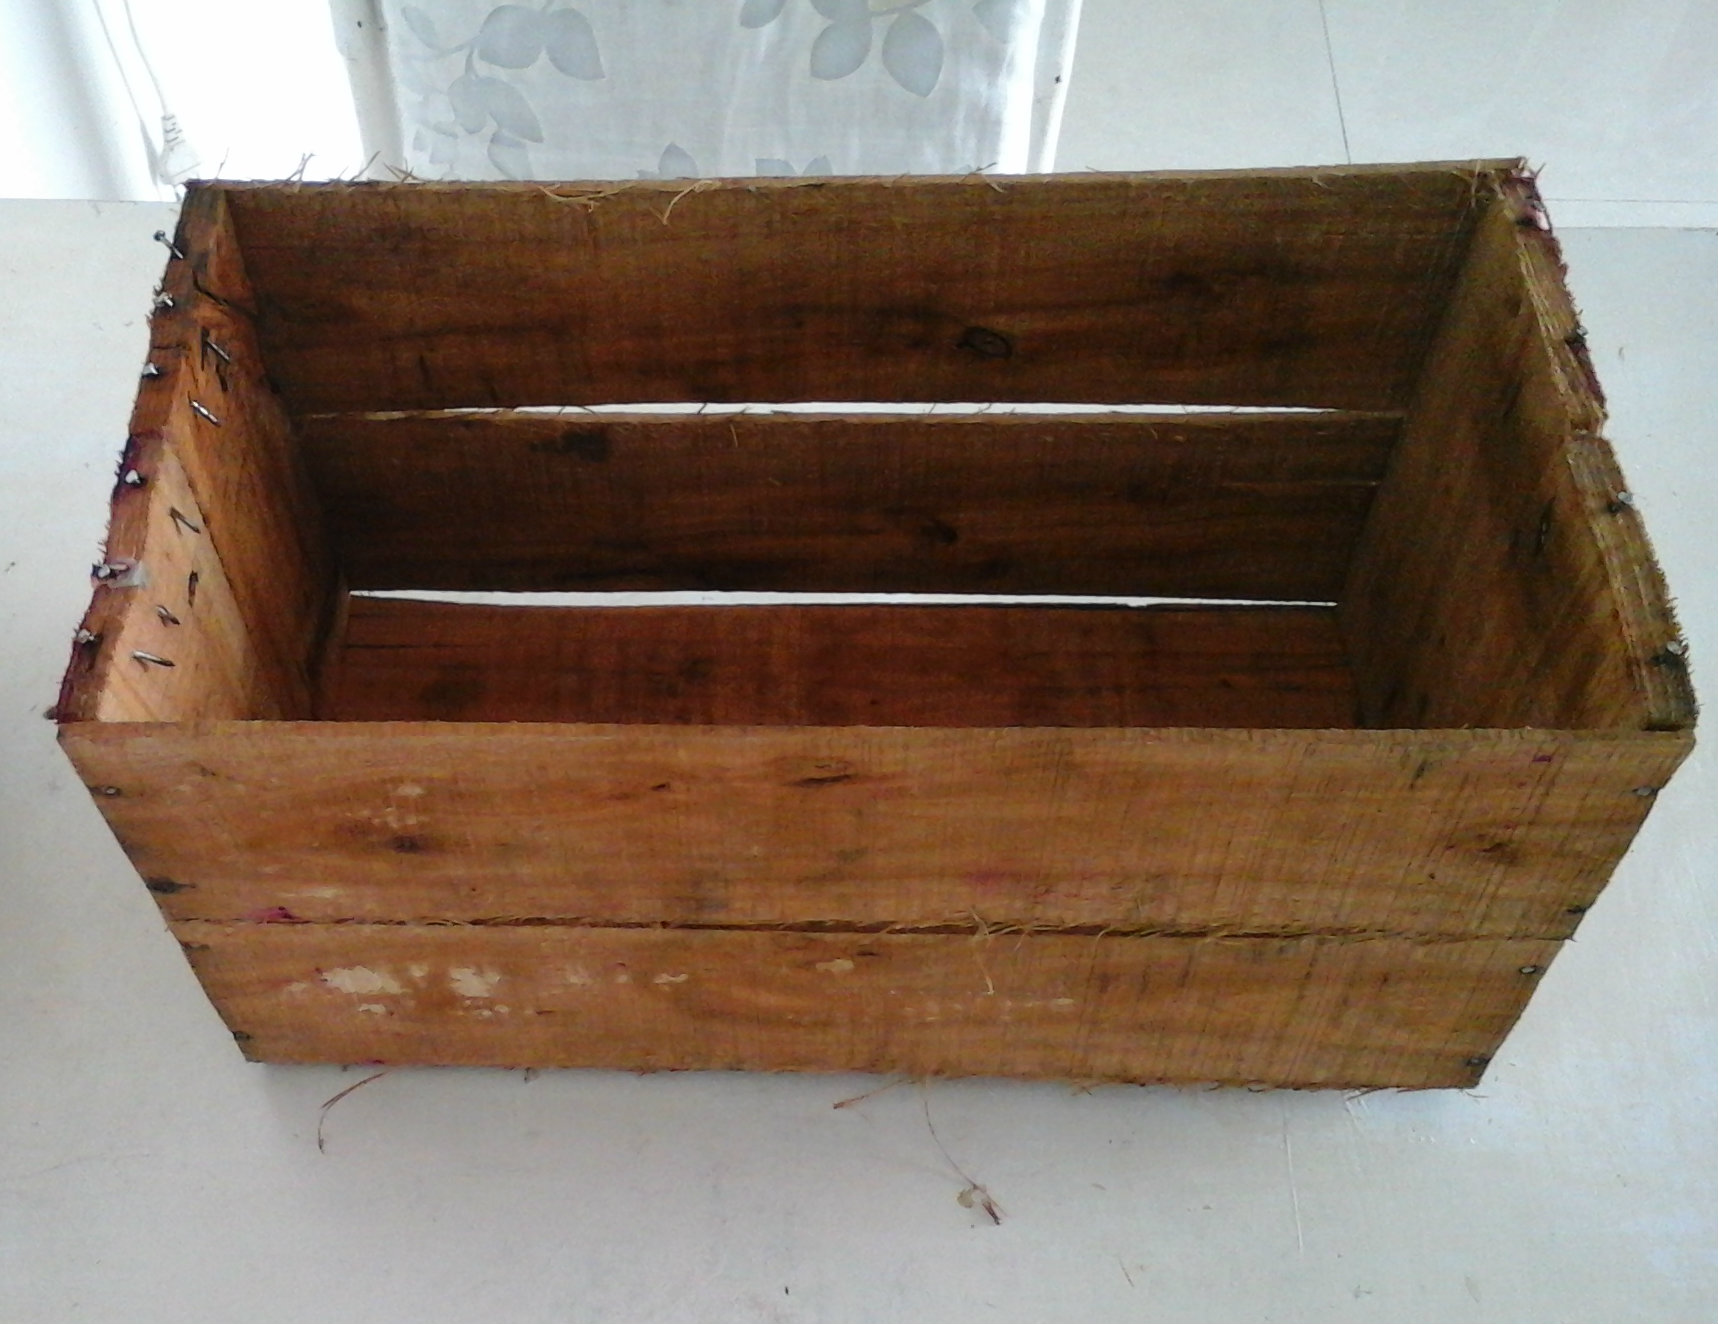
Ugly nails and stray splinters. This is your hand’s worst nightmare. I’ve had uggs scratches and a bandaid wrapping marathon with this one. But it finally succumbed to the decor rehab and turned into one beautiful little crate. Sand it a bit (or leave a bit of splinter where it would not hurt you to keep its rustic charm intact) and spray paint it.
I love my brush and paint, really, but because the air is full of moisture here (yes, the monsoons are still on) I decided to go with a spray paint. It takes a lot less time to dry and works evenly too on uneven surfaces like this.
Got home some tiny wheels from the hardware and fixed them at its corners. Here’s a collage too if you’d like to see. Honestly, I love blogposts that explain things to me. So I like to give as much info as I can. If you have figured already, just skip it homey 😉

Pretty simple. Just place it in four corners. Mark the nail points and fix the screws.
These wheels are the ones that are used industrially and revolved 360 degrees. You also get the straight moving variety. I prefer these ones though!
All you need to do next is keep your favorite books or two, a vase and wheel it around like a little child would. I’m wondering if I should tie a rope to it and carry it with me all round the house 😉 Let’s go 100 insane.
Here’s what it became!

Here’s a before and after:
 So yeah! That’s it from the sunny house this morning and more to come.
Have a crafty week ahead of ya!
Sharing at:
Monday
http://myuncommonsliceofsuburbia.com/inspire-monday-8/
http://www.thededicatedhouse.com/2014/09/make-it-pretty-monday-week-113.html
Tuesday
http://www.tinysidekick.com/makers-link-party-34/
Wednesday
http://www.savvysouthernstyle.net/2014/09/wow-us-wednesdays-186_10.html
Thursday
From My Front Porch To Yours – Treasure Hunt Thursday
Friday
The Shabby Nest – Frugal Friday
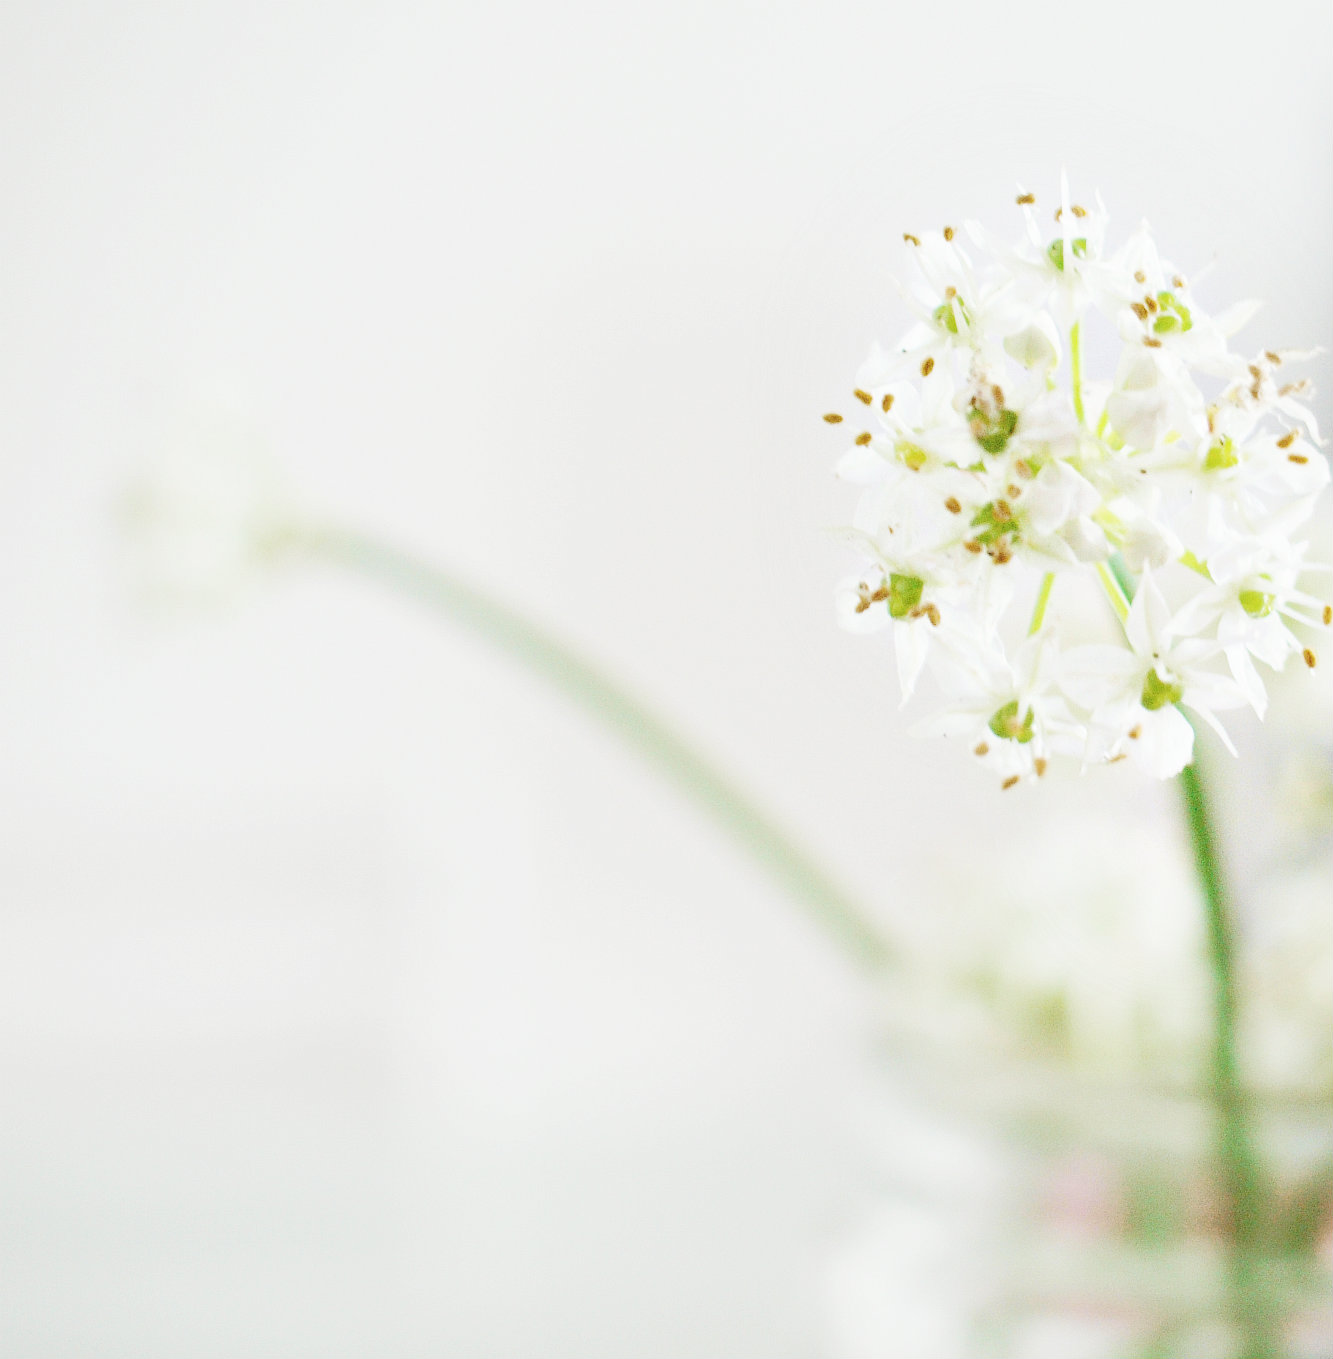
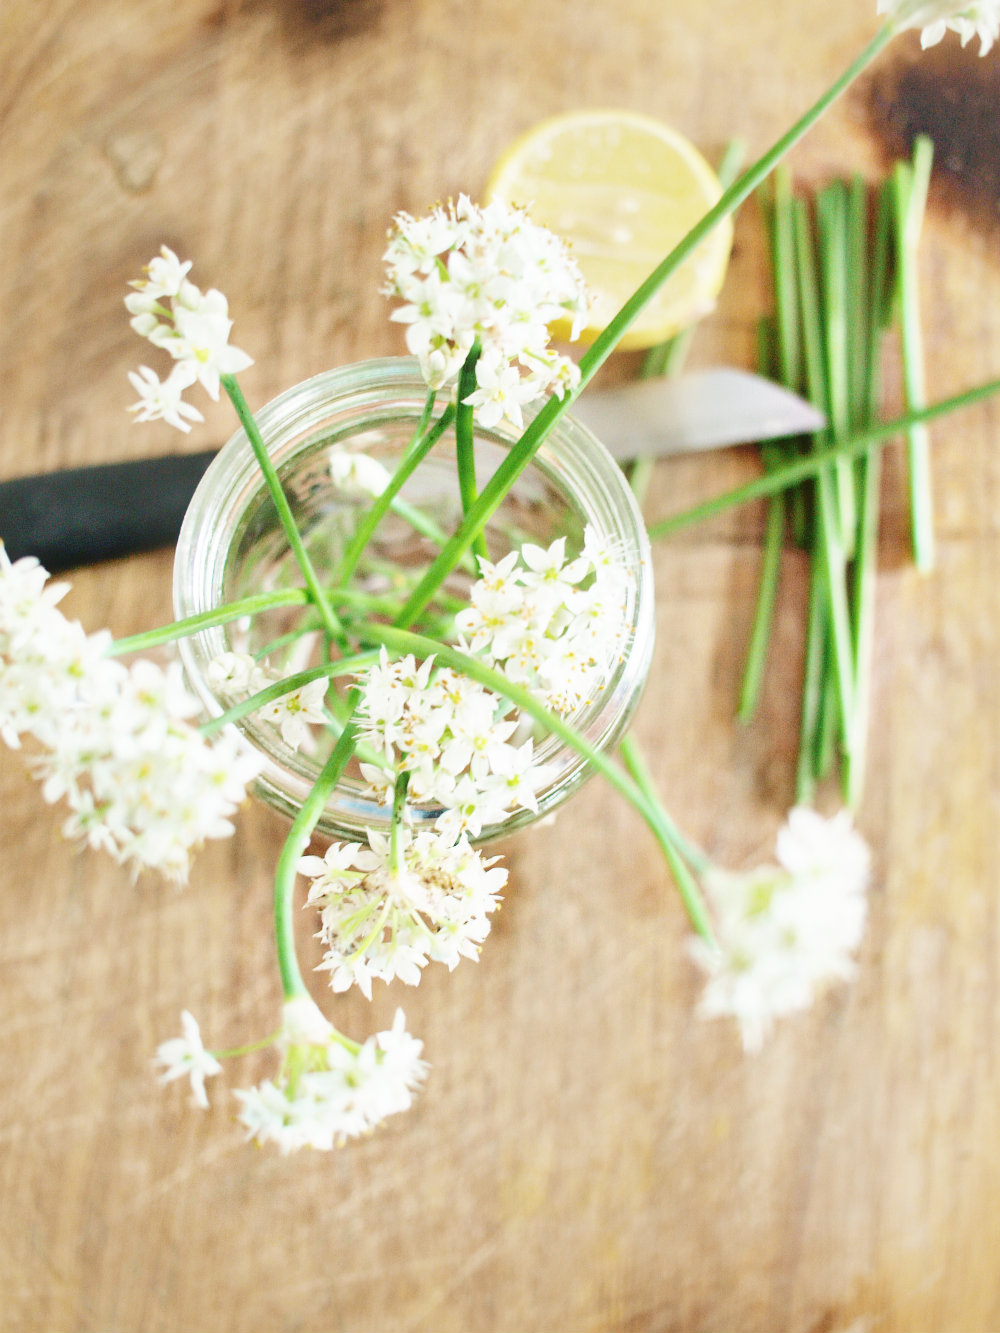
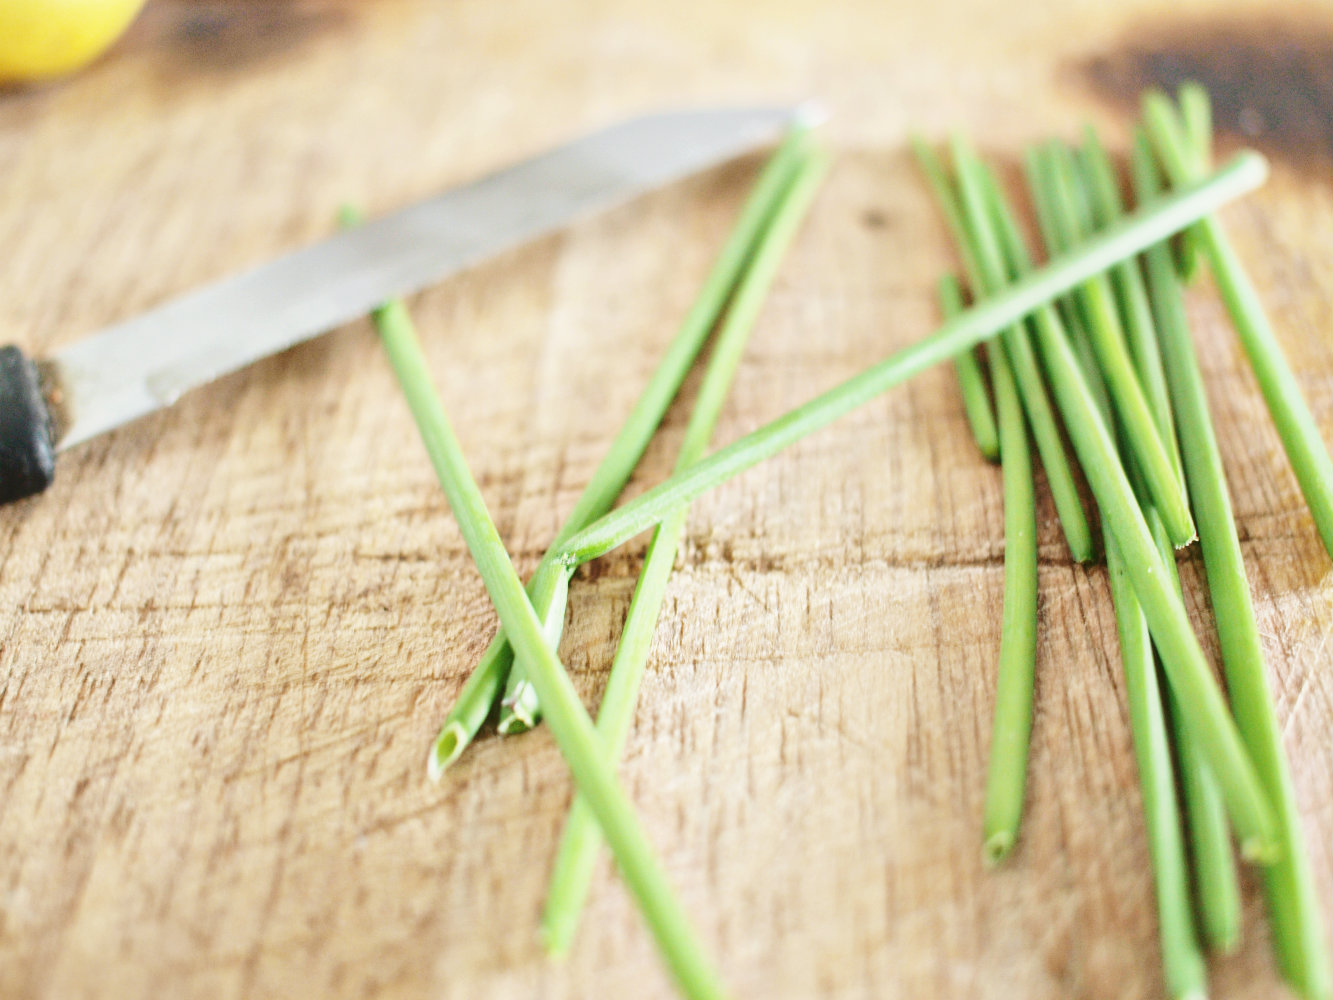
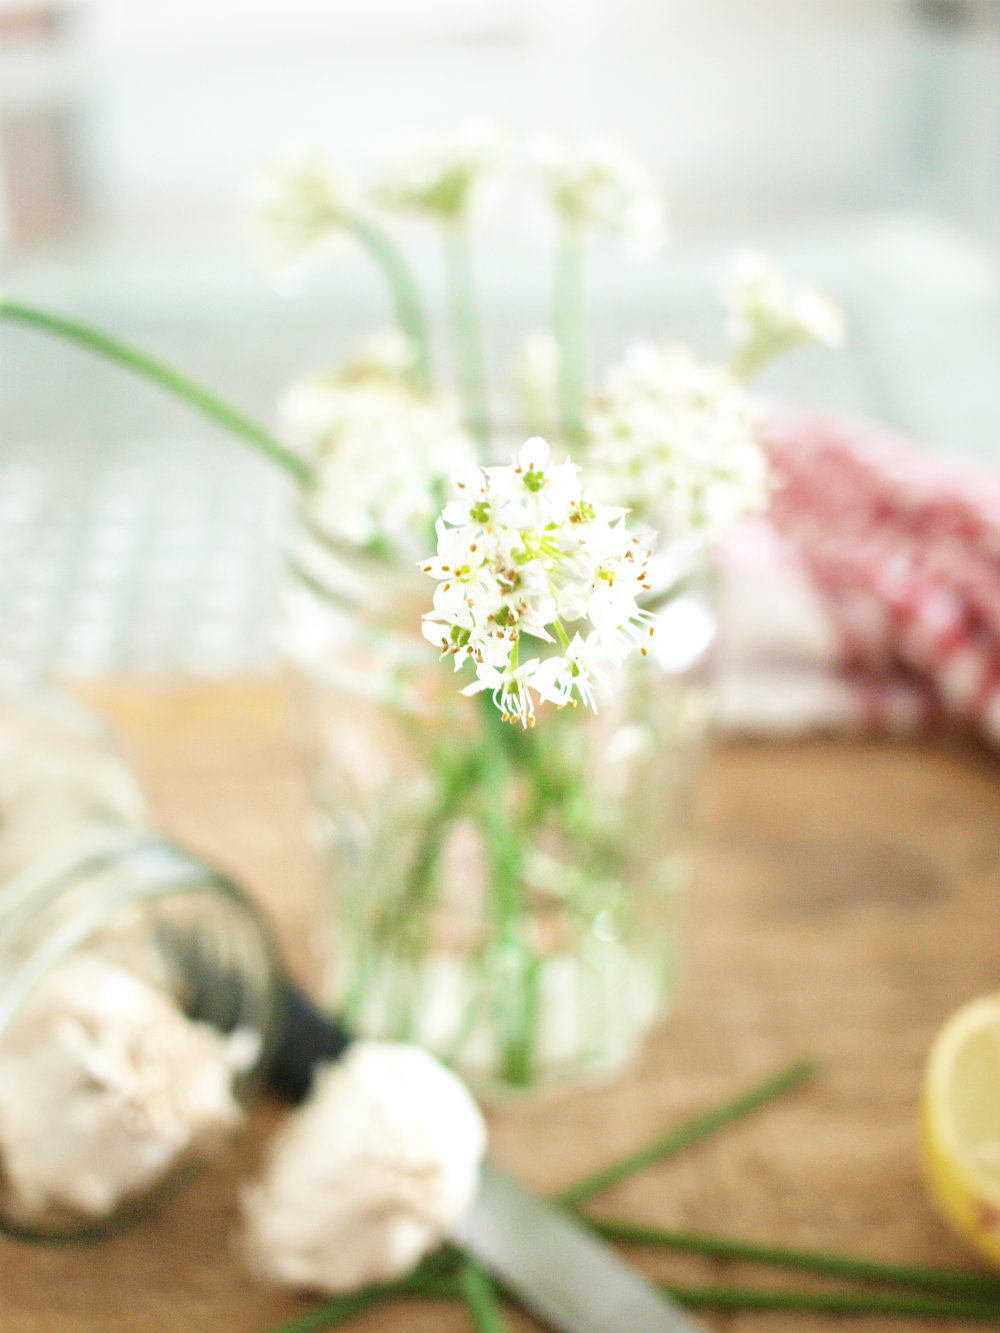
Well, hi! What’s going on? Who’s cooking what and how has it been since I left? Tell you what? No matter where I go and how pretty the place, there is absolutely no place like home. It is the best place on earth. What a relief it was to be back to all this old white and own bed. It was heaven! But guess what made me the happiest? My little garlic chive plant overflowing with flowers. I swear on garlic pods that I jumped like a little baby. What a welcome that was: it now rests beautifully in my old peanut butter jar. It’s important to snip the flowers for better growth of the chive plant- and man, was it heartbreaking- or I would have never.
I get so much joy out of seeing my plants flower and fruit: I actually clap my hands and jump and get the husband out of his nook to see my achievement. I’ll agree he finds it funny and I love him that he’ll throw in an advice or two. Oh you gotta listen to this. When I was adding compost to my plants last Saturday, I noticed a few tiny, green bulb like things in all of them. I rooted one out to find out that they are the tiny greens that appear on potatoes. Hahahahaha…the husband put them in. The day before he collected them off an old potato and asked me if they would turn into potato plants. I think I was doing something and said yes. Poor boy planted them. Its the boy in him that makes him my favorite person.
I am still laughing.
Anyway, as you can see the girl has settled down and all with her bits and bobs and is doing her gardening too and she thinks she should talk about her successful chive growing process. Because its very complicated (not) and not (not) everyone can grow chive in their tiny apartment garden, she thinks its a good topic to talk about and share 😉
Garlic chive is one of my favorite. It’s not too strong in flavor like the usual ones we have. I had it first, incorporated in herb-butter, and slathered on a grilled Basa and it blew me floors. Once I came home, I did a little research to find out that it is also called Chinese Chives owing to its extensive use in Asian cuisine: Apparently Japanese Miso Soup is incomplete without these. ooh la la! This herb needs to make it to trumatter’s kitchen!
Unfortunately, not many grow garlic chive to eat here in India. It is not one of the common “Bhaji” or green that you’d find on a menu or even in day to day cooking. In my pursuit of eating conti & Chinese, I ended up buying a bottle of dried chives. Soaked it in warm water and incorporated in butter but nope: not a hint of the beautiful pungent garlicky taste.
I heard from a friend that there is a big plant nursery in Vile Parle, Mumbai called Vriksha nursery which grows and sells exotic herbs. My next plan was to get home a plant. I went all the way to find out that they ran out of garlic chive but the owner was too kind to tell me how to grow them from garlic cloves and seeds. She is a wonderful woman, the owner of the nursery and she’d talk of chives like she is talking about her children. I love that. I love people who talks like that.
So I came home with a pack of seeds and followed her instruction to the T. Its just a bit of love and patience really: In 2 months you’ll be able to harvest your chives. Believe me you, since then I have had an unending supply of garlic chives: all you need to do to ensure it keeps on growing is snip the longer leaves and flowers. It’ll be heart breaking- everytime- to see the chives so short but trust me, in no time you’ll have an unending supply of garlic chive that you can incorporate in garlic butter, garlic infused oil, and dishes that call for a handful of it.
Here’s What you’ll need to grow garlic chives in your apartment garden:
Chive seeds or 4-5 large garlic- peeled
Compost
Fertilizer (Neem based will do)
Potting soil
A tub
How to grow garlic chives or Chinese Chives at Home
If growing from Seeds
Before planting, incorporate 4 to 6 inches of well-composted organic matter. Apply 2 to 3 tablespoons of all-purpose fertilizer (16-16-8) per square foot of planting area. Work compost and fertilizer into the soil to a depth of 6 to 8 inches. Start sowing in spring and plant seed 1/4th inches deep and 4 cm apart.
Water thoroughly and give it full sun.
Your plant will be ready in a month and ready to harvest in 2.
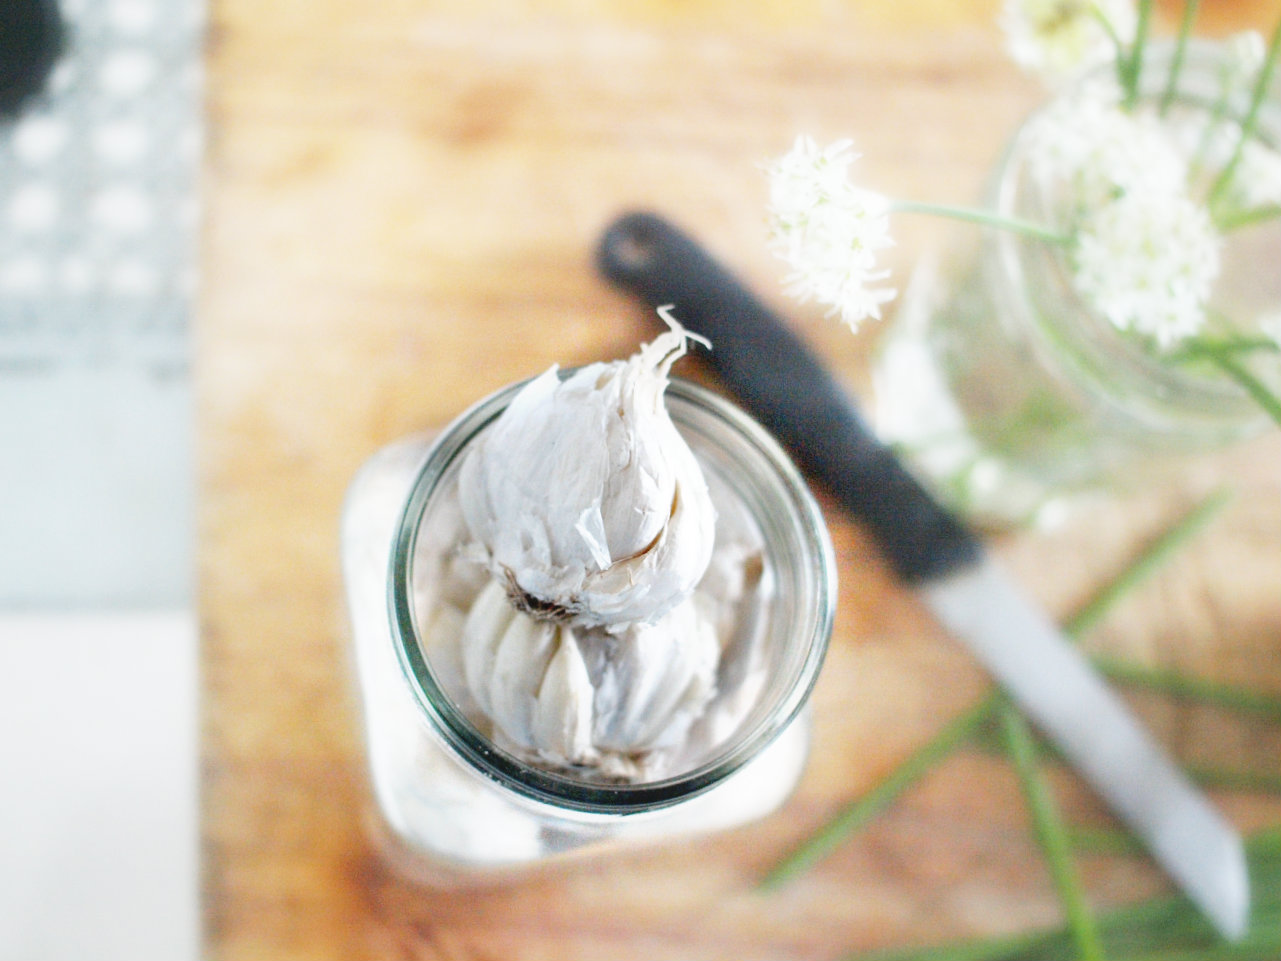
If growing from cloves
Pack garlic pods with their narrow end up in a tumbler and cover it with enough water to just reach its base.
Give it full sun till green chives appear.
In a well composted and festilized soil plant your pods with shoots above the soil.
Give it full sun and water regularly.
Harvest as soon as it flowers. On an average, you’ll need to harvest it every 30 days.
Enjoy your own homegrown organic chives.
Sharing at:
The Shabby Nest – Frugal Friday


